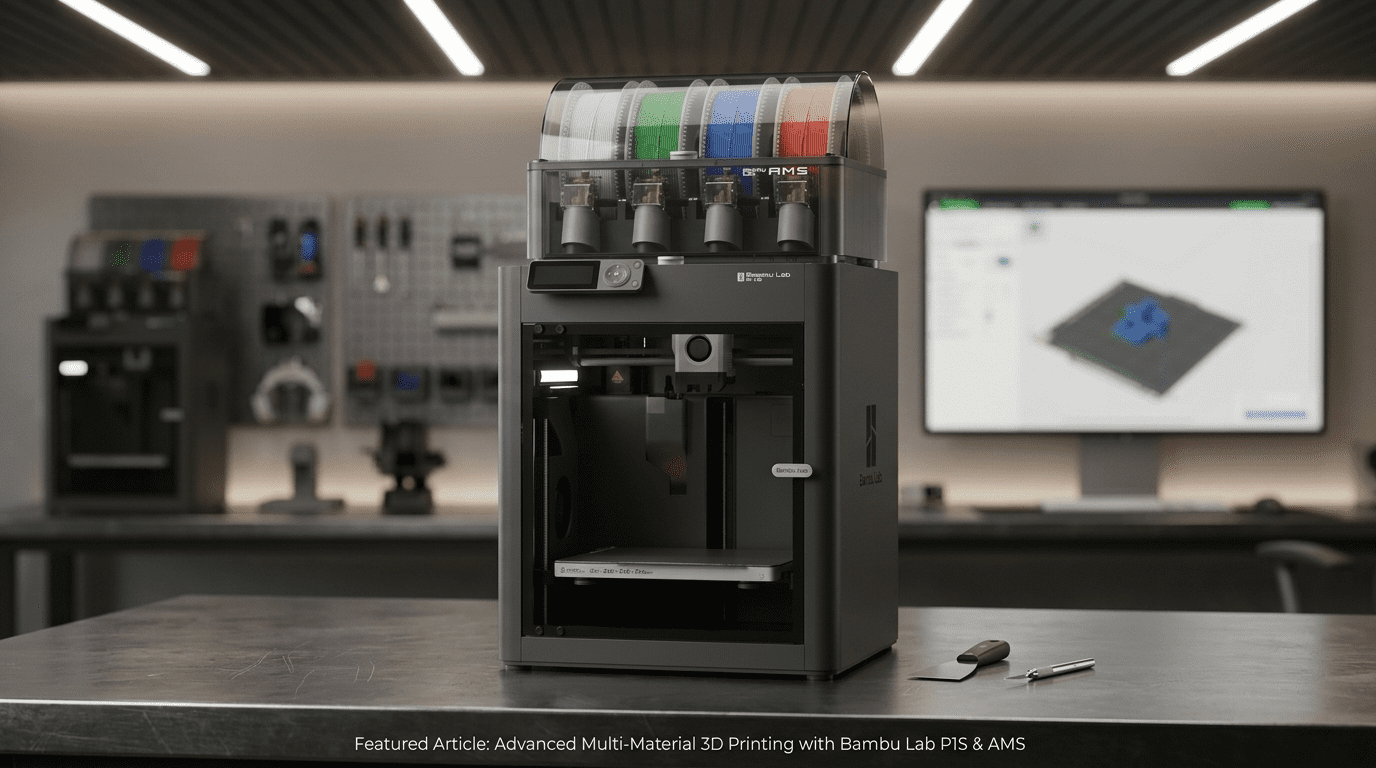
Bambu Lab P1S Combo Review: Best Entry-Level 3D Printer 2026
Disclosure: This article contains affiliate links. If you purchase through them, we receive a small commission at no extra cost to you. We only recommend products we’ve researched thoroughly.
Table of Contents
Three years ago, a 3D printer that auto-leveled, printed in 16 colors, ran at 500mm/s, and set up in 15 minutes would have cost $2,000 or more. The Bambu Lab P1S Combo — the P1S printer bundled with the AMS multi-color system — does all of that for $549. That price dropped significantly in February 2026, down from an original MSRP of $949, which is what changed the conversation around this machine.
For anyone looking at entry-level 3D printing in 2026, this is the machine that keeps coming up across every serious buyer’s guide — not because it’s the newest Bambu printer, but because the February price drop made it the most capable enclosed printer at its price point by a significant margin. Here’s the full review.
In the box
What’s in the P1S Combo box
The Combo package includes everything you need to start printing — and printing in multiple colors — on day one. Nothing significant is sold separately.
Note on unboxing
The AMS unit ships inside the printer chassis to save on box size. When you open the package, don’t be alarmed — it’s intentional. Remove the AMS from inside the printer, connect the cables per the quick-start guide, and the physical setup is done in about 15 minutes.
Specifications
Full specs
| Spec | Bambu Lab P1S Combo |
|---|---|
| Price | $549 (Combo with AMS) / $399 (P1S solo) |
| Printer type | CoreXY FDM — fully enclosed (CoreXY: a motion system where the print head moves in X and Y independently for faster, more precise movement) |
| Build volume | 256 × 256 × 256 mm (10 × 10 × 10 inches) |
| Max print speed | 500 mm/s |
| Acceleration | 20,000 mm/s² — prints a Benchy in ~18 minutes |
| Max nozzle temperature | 300°C (all-metal hotend, 0.4mm stainless steel nozzle included) |
| Max bed temperature | 100°C |
| Supported materials | PLA, PETG, TPU, ABS, ASA, PVA, PET, PA (Nylon), PC (Polycarbonate) |
| Multi-color capability | Up to 4 colors with 1 AMS / Up to 16 colors with 4 AMS units stacked |
| Bed leveling | Fully automatic — no manual calibration |
| Enclosure | Fully enclosed with glass door, glass top, activated carbon filter, chamber temperature regulation |
| Camera | Built-in — remote monitoring and timelapse via Bambu Studio app |
| Connectivity | Wi-Fi — Bambu Studio (PC/Mac) and Bambu Handy (iOS/Android) |
| Filament diameter | 1.75mm |
| Setup time | ~15 minutes out of the box |
The printer itself
Bambu Lab P1S review — what makes this printer different
Most entry-level 3D printers are open-frame machines. The printing happens in open air, which limits your materials and means fighting temperature fluctuations on longer prints. The P1S is fully enclosed, which matters more than it sounds.
The enclosure changes what you can print
Most open-frame printers are limited to PLA — a beginner-friendly plastic that works fine for decorative prints but warps badly when used for anything functional in a warm environment. The P1S’s enclosed chamber with temperature regulation lets you print ABS, ASA, Nylon, and Polycarbonate reliably. These are engineering-grade materials used in automotive parts, outdoor equipment, and anything that needs to survive heat or mechanical stress. You’re not locked into beginner plastics from day one.
Speed that’s actually usable
500mm/s is the rated maximum, but the more meaningful number is the 20,000 mm/s² acceleration — how fast the printer gets up to speed and slows down. Bambu’s vibration compensation keeps prints clean at speeds where other machines start producing wavy, distorted surfaces. The fast prints actually look good. A standard benchmark model called the Benchy — a small tugboat universally used to test printer speed and quality — prints in 18 minutes on the P1S. On a typical budget open-frame machine, that same model runs 90 to 120 minutes. That time difference compounds on every project you do.
Truly automatic calibration
Bed leveling — making sure the print surface is perfectly flat before each print — is one of the most common pain points in 3D printing. On most budget printers, you do it manually with a piece of paper and four adjustment knobs, and it drifts constantly. The P1S handles this automatically before every single print. Press print, walk away. The printer checks its own calibration and corrects it without any input from you.
Activated carbon filter — safe in any room
Printing materials like ABS produce fumes you don’t want to breathe. The P1S’s built-in activated carbon filter absorbs those volatile compounds inside the sealed chamber before they reach room air. This makes the P1S genuinely safe to run in a home office or bedroom when printing any standard filament — unlike most printers that require a window or dedicated ventilation for anything beyond PLA.
Multi-color printing
The AMS — how multi-color printing actually works
The AMS — Automatic Material System — sits on top of or next to the P1S and holds up to four spools of filament. During a multi-color print, it automatically feeds the right color to the printer at the right moment, cutting and purging between color changes without any input from you. Four colors in one print is the standard setup. Stack up to four AMS units for 16 colors total.
The “poop” factor — what multi-color printing actually costs you
Every time the AMS switches colors, it purges — flushes the old color out of the nozzle before laying down the new one. The purged material, which the 3D printing community universally calls “poop,” collects in a small box next to the print. A highly multicolored print with many color transitions can waste 20–30% of the filament you load. Budget for this if multi-color is your primary use case.
The AMS also keeps filament dry. Moisture ruins filament. Damp spools produce bubbles, weak layers, and rough surfaces on finished prints. The AMS has a sealed enclosure with desiccant packs that maintain low humidity around your spools — a feature most standalone filament storage boxes charge $30–$50 extra for.
One practical note: the AMS works best with Bambu Lab’s own filament, which has RFID chips — the same contactless tag technology used in tap-to-pay credit cards — that the AMS reads to automatically detect the material type, color, and correct print temperature. When loading third-party filament, the AMS will prompt you to select the material type and color manually. Check the recommended print temperature on the spool label and match it to the closest Bambu preset. For most third-party PLA brands, the standard Bambu PLA profile works without adjustment.
Getting started
Setup and daily use
After the first print, the main recurring tasks are emptying the poop chute after multi-color prints, replacing the activated carbon filter every few months, and occasionally cleaning the build plate with isopropyl alcohol to maintain adhesion.
Be aware
Honest limitations
No LIDAR — calibration has limits with advanced engineering materials
The P1S uses a vibration sensor for calibration. The more expensive X1C uses LIDAR — a laser measurement system that gives more precise surface readings — which matters for high-shrinkage engineering materials like Nylon and Polycarbonate printed in complex geometries. For PLA, PETG, ABS, and ASA, you won’t notice the difference. If those engineering materials in demanding applications are your primary goal, budget up to the X1C.
The camera is functional, not impressive
The built-in camera produces low-resolution still images rather than live video. The Bambu Handy app refreshes the image periodically — enough to check whether a print started and catch major failures early, but not a live feed. If real-time monitoring matters to you, this is worth knowing before you buy.
Carbon fiber and glass fiber filaments need a nozzle upgrade first
The included 0.4mm stainless steel nozzle will wear down quickly when printing abrasive materials like carbon fiber or glass fiber composites. Before printing these, replace it with a hardened steel nozzle — available directly at bambulab.com, search “hardened steel nozzle 0.4mm,” priced around $8–$15. Installation takes about five minutes using the wrench included in the box, and the printer’s touchscreen walks you through it under Maintenance → Nozzle Replacement.
Print jobs route through Bambu’s cloud servers by default
If you’d rather not have print jobs routed through an external server, enable LAN-only mode before your first print. It takes two minutes and nothing about the printer’s functionality changes. To enable it: on the printer’s touchscreen, go to Settings → Network → LAN Mode → toggle on. Then in Bambu Studio, go to Preferences → Connection → select LAN mode and enter your printer’s IP address, shown on the printer screen under Settings → Network → IP Address.
The bottom line
Is the Bambu Lab P1S Combo worth it?
Buy the P1S Combo if…
You want to start 3D printing without spending six months learning the fundamentals on a frustrating budget machine first. You want multi-color capability from day one. You plan to print functional parts with real materials — ABS, ASA, or Nylon — not just decorative PLA. You want a machine with a massive community, mature software, and years of troubleshooting already documented online.
Save the $150 and buy the P1S solo ($399) if…
Multi-color printing isn’t something you’ll use immediately. The AMS can be added later — you don’t have to buy it now. Start with the solo P1S, learn the machine, and add an AMS unit when you’re ready to go multi-color. The printer is fully functional for single-color printing without it.
Step up to the X1C ($899+) if…
You need LIDAR calibration for consistent results with engineering-grade materials in demanding applications. Or you want a better camera for real-time monitoring. For standard materials and everyday printing, the P1S produces results that are essentially indistinguishable from the X1C at $350 less.
Our Pick — Best Entry-Level Enclosed 3D Printer
Bambu Lab P1S Combo
P1S Printer + AMS Multi-Color System
Amazon Price
$549
Affiliate link — we may earn a commission at no extra cost to you. Price may vary.
The Bambu Lab P1S Combo is the clearest answer to “what 3D printer should I buy” for anyone who wants to start seriously without starting over on a budget machine six months later. At $549 for an enclosed, multi-color, auto-calibrating printer with professional-grade speed, it makes printers from three years ago look obsolete. Most of them are.